The Vivo Y20A is a smartphone that packs a punch when it comes to its features. However, the default camera application may not exploit its full potential. If you’re keen on enhancing your photography game, Google Camera (GCam) offers the perfect solution. In this comprehensive guide, we’ll delve into how you can download, install, and configure GCam on your Vivo Y20A to take pictures like a pro.
Overview: Vivo Y20A Specifications
Before we dive into the world of GCam, let’s quickly revisit what the Vivo Y20A brings to the table. Boasting a 6.51-inch touchscreen display and backed by 3GB of RAM, the Vivo Y20A runs on Android 11 and houses a hefty 5000mAh battery. As for its camera setup, the rear features a 13 MP primary camera, complemented by two 2 MP cameras, while an 8 MP front-facing camera serves your selfie needs.
Why GCam on Vivo Y20A?
You might be wondering, why go through the trouble of installing GCam when the phone already comes with a native camera app? Well, the feature-rich nature of GCam is designed to provide you with a range of options that make photography more intuitive and results more captivating. Below are some notable features:
- New User Interface
- RAW image support
- Seamless panorama shooting
- Natural and Soft Focus sliders for portrait mode
- Quick access to Google Lens
- Audio recording in Panorama mode
- Live Lens, H265 video recording, Motion Autofocus, and more
Note: Some features might not be available across all GCam mods. Therefore, feel free to explore different APK mods and configuration files.


Get Your Hands on GCam for Vivo Y20A
Keen to get started? Here’s where you can download the latest GCam mods tailored specifically for the Vivo Y20A:
These have been thoroughly tested to ensure compatibility with the Vivo Y20A running Android 11.
How to Install GCam on Vivo Y20A
If you’re new to the GCam scene, follow these steps carefully:
- Download your chosen GCam mod APK from the links provided above.
- Enable ‘Unknown Sources’ for app installations in your settings.
- Navigate to the APK file and tap to install.
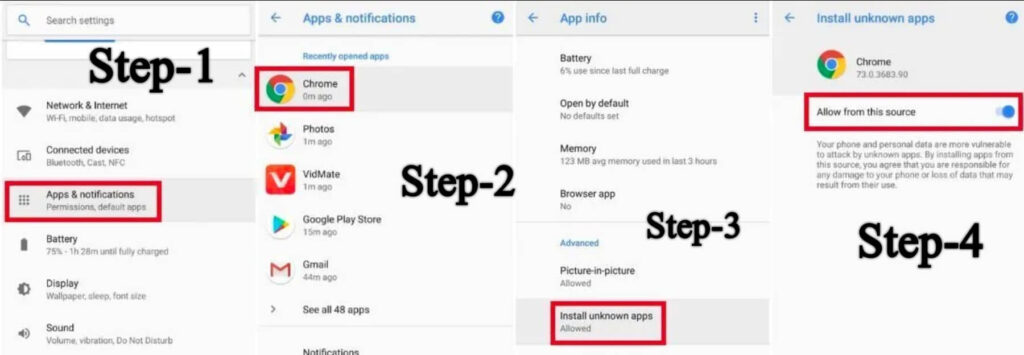
Pro Tip: If you’re prompted to allow installations from the browser you downloaded the APK file from, go to Settings > Apps & notifications > [Your browser] > Install unknown apps and toggle on ‘Allow from this source.’
Setting Up the Configuration File for Optimized Performance
To take full advantage of GCam, you’ll want to set up a configuration (XML) file. Follow these steps:
Vivo Y20A Config File Download
- Download the Vivo Y20A Config File.
- In your internal storage, create a new folder named either ‘LMC 8.2’ or ‘LMC 8.4.’
- Paste the downloaded XML file into this folder.
- Open the GCam app and double-click beside the shutter button.
- Select your downloaded XML file, and you’re good to go!
Your photography experience on the Vivo Y20A should now be elevated.
If you encounter any issues or have questions about GCam on the Vivo Y20A, don’t hesitate to drop a comment below. We’ll get back to you at the earliest. Happy shooting!